
dBASE onLine Training
The Hands-on Project
Michael Nuwer
November 11, 2002
|
dBASE onLine Training
|
|
Creating Reports |
There are many reports that can be added to the Pet Clinic application. Following the tutorial, we can create:
You're encouraged to create your own versions of these reports and then add them to the Hands-on Project. You've already built similar reports for the tutorial application; it is good practice to build them again for the Pet Clinic application.
My versions of the above reports are in the main Pets folders. The file names are: Customer.rep, PetStatus.rep, and PetStatements.rep. If you choose not to create your own similar reports, you can still, in the next Session, include these reports in the application's menu.
In addition to the three reports above, there are two other reports you can create. The first is a Pet Information report and the second is a Daily Revenue Summary.
The Pet Information Report will display information about a Pet and list medical treatments that have been provided at the Clinic. We will need a datamodule, the report, and a form to select the Pets to be printed.
The Datamodule
The Pet Information Report is based on a datamodule which includes Customers, Pets, Visits, VisitDetails, and Treatments. Figure 6.1 shows a layout of this datamodule. The master table in this datamodule is Pets. We must create a parent-child relationship between Pets2 and Visits1 (a one-to-many relation) and another between Pets2 and Customers1. Notice that Customer1 is a one-to-one relationship and is used to reference the pet's owner and address information.
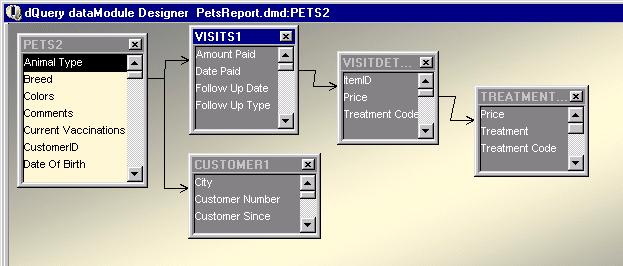
| Query Object | Index Name | Link Field |
| Visits1 | PetID | PetID |
| VisitsDetails1 | VisitID | VisitID |
| Treatments | Treatment Code | Treatment Code |
| Customer1 | CustomerID | CustomerID |
After setting the relations among the queries, save and close the datamodule.
The Report
This report, like all the reports in the Tutorial, is going to be subclassed from a base report. You can use the Base.crp custom report that you created in the Tutorial Project. You shouldn't need to change anything in this class.
Figure 6.2 shows the layout of the report. The detail band contains the Visit Date, the Visit Type, the Treatment Name and the Treatment Code. This data is drawn from three different query objects and is listed together in the detail band. I set the "suppressIfDuplicate" property to true for the Visit Date field.
You might note that a lookupSQL was not used for the Treatment Code. This is because we want to print both the code and the description. In the Tutorial Project there were two different ways used to accomplish this goal. In the current report we set a relation between VisitDetails and Treatments, and used fields from both tables. This is just another way to do it.
The Pet Information Report is grouped by the "PetID". In the group header there are various fields that contain information about the pet. This information is drawn from the Pets2 query and the Customer1 query.
A number of the fields in this part of the report have been transformed for display purposes. In the Pets table, "Deceased", "Neutered_Spayed", and "Current Vaccinations" are logical fields. In the report these are transformed in the canRender event to display "Yes" or "No".
In addition, the animal's sex is stored as "M", "F", or "U". These characters are converted to "Male", "Female", and "Unknown" for the report.
When I created this report, I found that care needed to be taken with the vertical alignment of the object in the header. If objects are placed on the same relative line you must align them with the same "top" property, otherwise strange things happened when the report is printed. The Alignment toolbar is helpful for this task.
You should also be aware that there are many pets that do not have any visit information in this sample database. If you want to see visit information in the detail band while you are designing the report, try setting a filter or using a SQL select for a Pet with data. "Margo" (PetID = 8) has good test data. The filter can be set in the datamodule with dQuery. But be sure to remove it when you put the report into production.

Adding User Interaction
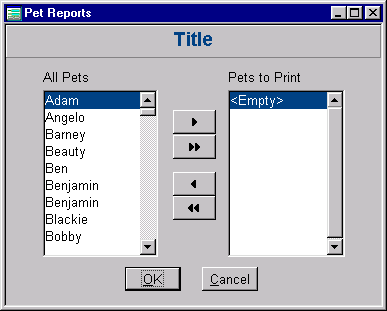
Soliciting user input is common in a reporting system. For example, users will often need to print information for a specific customer or a specific date range. In this part of the Hands-on project we will create a form that lets the user select the pets to print and prints the reports. Perhaps the user of this system needs to print the pets who have a visit scheduled on a given day and the Doctor wants the most up-to-date records when she sees the animal.
For this form we will introduce a control called mover.cc. This is a custom class that is included in the dUFLP and lets the user move items from a source list on the left to a destination list on the right. Mover controls are common in many windows applications. Our form is depicted in Figure 6.3.
You should find a copy of Mover.cc in the main folder for the Pets project (c:\pets). The file is included in the installation archive used in Session One.
Mover.cc is contained in the dUFLP library. If you have already installed the dUFLP, you can use mover simply by calling it via the source alias ":duflp:mover.cc". However, the controls used in the Mover class are derived from the standard dBASE controls. This means that the "look and feel" of a form built with the class will be different than the other forms in our application.The mover.cc control included with the Hand-on Project is modified so that it uses your custom controls -- the ones in MyControlsPets.cc. This way if any of the base control properties in your custom controls file change, the Mover class will inherit those changes. As you become more familiar with class constructors and control properties, you too will be able to hack code to do about anything you need.
To begin we must add the mover.cc control to the component palette. Switch to the command window and type:
set procedure to mover.cc additive
Next you can create the form. The main steps are:
Now we need to write some code to make the form work.
First we need to load the listbox on the left with the pet's names. In the form's onOpen event handler add the following code:
   function form_onOpen
      // Create a new array called aSourceList
      aSourceList = New Array()
      // go to the first row of the rowset
      this.rowset.first()
      // Walk down the rowset and add records
      // to the array.
      do
         aSourceList.add(this.rowset.fields['Pet Name'].value + ;
             space(50) + this.rowset.fields['PetID'].value)
      until not this.rowset.next()
      // assign the array to the sourceArray
      // that is contained in the mover control
      this.MOVER2CONTAINER1.SourceArray = aSourceList
      return
Note that the items that will appear in the list box include the Pet's name and the PetID. The PetID, however, is 50 spaces to the right of the Pet's Name. We must know the PetID when we print the reports but it is not necessary that the user see this information.
Now that our user has a list of pets which they can select for printing, we want to print the report for the selected pets. Create an onClick event for the OK button. When you asked whether you want to overwrite the existing method, click Yes. The onClick event will override the code in the parent class. To print the reports we will use a loop that walks through the destination list in the mover control. The onClick event for the OK button looks something like the following:
   function YESBUTTON_onClick
      local i, r, nPetID
      if form.MOVER2CONTAINER1.destArray[1] # "<Empty>"
         set procedure to petsReport.rep addi

         // Loop through each element in the destination array
         for i = 1 to form.MOVER2CONTAINER1.destArray.size
            // Create a new report on each pass
            r = new petsReport()
            // The Pet ID to print will be the right most characters
            // in the string. That's were we put it when we loaded
            // the array.  So we take the first 7 character from
            // the right of the string and convert the string
            // to a number.
            nPetID = val(right(form.mover2container1.destArray[i],7))
            // Set the range of the *Report's* rowset to the petID
            // that we want printed.
            r.petsreportdatamodule1.pets2.rowset.setRange(nPetID)
            // Uncomment the next line to send the report dirctly
            // to the printer.
            // r.output = 1  // printer
            // Print the report
            r.render()
         next
		 close procedure petsReport.rep
      else
         msgbox("Please select the Pets to print")
      endif
That's all that we need to do. Save the form and test it. Tom and Jerry are two pets that have data you can use for testing.
You'll notice that each pet prints in a separate report viewer. This is because the loop creates a new report object for each item in the destination array. Normally, I send this type of report directly to the printer and bypass the multiple report viewer. However, this project is a learning exercise and there's no need to waste paper. If you want to print the report, uncomment the line that sets report's output property.
The second report we are going to create prints a revenue summary of daily visits. We will need a datamodule, a report, and a form to get a date range. The report will print each pet that visited the clinic on a given day and the revenue generated by the visit.
Figure 6.5 depicts the Daily Visit Report in design view. We will reuse the Visits.dmd datamodule for this report.
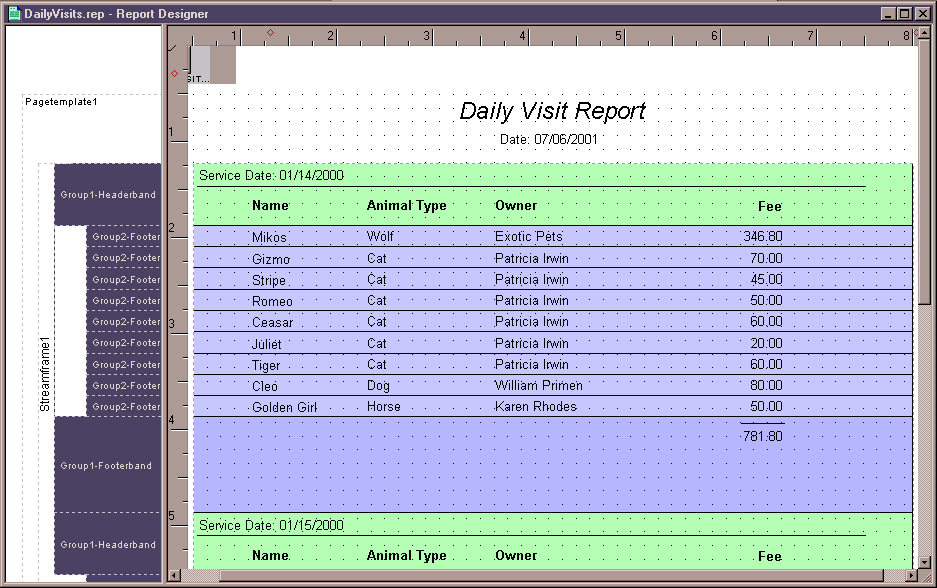
The first thing you should notice is that there is no visible detailBand in this report. All the data is printed in the Group header and footer bands. We will use two groups in this report: (1) Visit Date and (2) PetID both taken from the Visits1 query. This way we can print a summary for each pet that visited the clinic on a given day and the revenue generated by the visit.
The groupby property for Group1 is Visit Date. In the group header there is a text field for the Visit Date and heading fields (Name, Animal Type, Owner, and Fee) for the data listed underneath. (The heading fields and the data fields are not in the same band.)
The groupby property for Group2 is PetID. In this case the data is printed in the group footer and the group header is not used. The group 2 footer band contains an aggregate summation of the Prices charged against the pet. You should know how to do this from the Tutorial. In addition the Pet Name, Type of Animal, and Customer Name fields are printed using an aggregate function.
The function that is used here is agMax(). Since the value for each detail row (rows that are not printed but which are summarized) is always the same, agMax() will return one instance of that value. The code block looks like this (remember that it must be all on one line):
   this.parent.parent.agMax( ;
      {||this.parent.rowset.parent.parent.;
	     pets2.rowset.fields["pet name"].value})
Finally, we want to place another aggregate summary function in the Visit Date footer, which will give us the total revenue for the day.
That is all we are going to do with the Daily Visits report at this time. In the next Session we will tie the report to the application's menu and we will use a form to open this report. But that is getting a bit ahead. So for now just save this report and don't worry about filtering the dates that should be printed.
The Legal Stuff: This document is part of the dBASE onLine Training Program created by Michael J. Nuwer. This material is copyright © 2001-2002, by Michael J. Nuwer. dBASE, dBASE Plus, dBASE SE and dB2K are copyrighted, trademarked, etc., by dBASE, Inc., the BDE (Borland Database Engine) and BDE Administrator are copyrighted, trademarked and all that by Borland Software. This document may not be posted elsewhere without the explicit permission of the author, who retains all rights to the document.